Mastering Espresso Dose and Tamp
You’ve dialled in your grind, your beans are freshly roasted (hopefully by us at BrewClan 😉), you lock in your portafilter, hit the button, and… disaster.
The shot gushes out unevenly, one side faster than the other. Or maybe it dribbles so slowly you could finish a Netflix episode before it’s done. You take a sip, bitter, hollow, disappointing.
Most times, it’s not the beans. It’s not even the machine. The culprit? Your dose and tamp.
Key Takeaways
- Espresso dose is the foundation, consistently measure your coffee dose (usually 16–20g) with a scale for reliable flavor.
- Even distribution of grounds before tamping prevents water channeling and ensures balanced extraction.
- Tamping should be flat, level, and consistent; exact pressure matters less than repeatability.
- Avoid common tamping mistakes like angled tamping, double tamping, and messy edges to reduce channeling.
- Tools like WDT, calibrated tampers, and levelers can improve consistency and reduce user error.
- Advanced tips include combining distribution techniques, gentle pre-tamping shakes, and using tamping aids.
- The espresso taste improves dramatically once dose, distribution, and tamping become controlled, repeatable actions.
Why Dose & Tamp Matter
Think of espresso like building a road for hot water to travel through. Too little coffee, and the water races right through, leaving you with a weak, sour shot. Too much, and it clogs up like Delhi traffic at rush hour - bitter, harsh, over-extracted.

Then comes tamping: if you press unevenly, you’ve basically tilted the road. Water, being lazy, takes the easier path, and suddenly half your puck is ignored while the other half is overworked.
But here’s the good news: once you nail your dose and tamp, espresso becomes less of a gamble and more of a science. Smooth, balanced, crema-rich shots start becoming your everyday reality, not just a lucky accident.
By the time you’re done with this guide, you’ll know exactly how to control dose and tamp so your espresso isn’t left to chance. Instead, every pull will feel like you and your coffee are finally speaking the same language.
What is Espresso Dose (Explained Simply)
If you’re new to espresso, the word dose might sound like something out of a pharmacy. But in coffee-speak, dose is simply the amount of ground coffee you put in the portafilter.
Think of it like a recipe: too little flour, your cake collapses; too much, and it turns into a brick. Espresso works the same way.
The sweet spot is usually between 18–20 grams for a standard double shot. That’s enough coffee to give body and sweetness, but not so much that your espresso feels like chewing on dark chocolate dust.
Here’s the thing, dose isn’t just about numbers on a scale. It’s about consistency. If yesterday you dosed 18.5 g and today you randomly scooped 16 g, you’ve already changed the entire flavor journey.
One shot might taste like a smooth caramel river; the next, like lemon juice poured on burnt toast.
That’s why baristas swear by weighing every dose. A digital scale isn’t a coffee snob’s vanity tool, it’s their compass. With it, you stop “winging it” and start dialing it in.
Bottom line? Your dose is the foundation. Nail it, and you’ve already won half the espresso battle.
Why Distribution Comes Before Tamping
Here’s a secret many beginners miss: tamping isn’t actually your first step after grinding. Before you press that coffee bed down, you’ve got to make sure the grounds are evenly distributed.
Why? Because espresso water is sneaky. It doesn’t politely flow through all the coffee, it takes shortcuts.
If there’s a clump or an air pocket, water will tunnel straight through it, leaving some grounds under-extracted (sour, sharp) and others over-extracted (bitter, hollow). This dreaded problem is called channeling.
Distribution is your defence. By spreading grounds evenly before tamping, you’re basically telling the water, “Hey, no shortcuts - take the full journey.”
Baristas usually do this one of two ways:
- WDT (Weiss Distribution Technique): Stirring the grounds gently with thin needles to break up clumps and level the surface.
- Tapping or shaking: A few strategic taps of the portafilter on the counter or palm to settle grounds evenly.
Both work. The goal is the same: create a smooth, fluffy, even coffee bed that’s ready for tamping. Once that foundation is set, tamping simply compresses it into a solid, uniform puck.
Think of it like building a house, you wouldn’t press down bricks before leveling the ground first. Distribution is that leveling. Skip it, and your tamping won’t save the shot.
How to Dose Accurately
If espresso is a science, then dosing is the first equation you need to solve. Every gram you put in the basket changes the density of the coffee bed, which in turn changes how water flows through it.
Too little, and you’ll end up with a weak, watery shot. Too much, and the puck is packed so tightly that water struggles to get through, leading to over-extraction.
The easiest way to take the guesswork out? Use a scale. Every single time.
A single gram might not look like much, but in the world of espresso, it’s massive. Imagine shifting from 17g to 18g, that’s almost a different recipe.
Relying on “eyeballing” the basket (how full it looks) doesn’t cut it, especially since beans vary in density, roast level, and even how they react to humidity.
What looks like a full basket with one coffee might actually be under-dosed with another.
Here’s a simple rule of thumb:
- Home espresso setups usually work best in the 16–18g range for a standard double shot.
- Professional baristas might push it a little further, often between 18–20g, depending on their machine, basket size, and the style of espresso they’re after.
But the exact number isn’t as important as being consistent. A scale ensures your starting point never shifts, which means you can tweak other variables (like grind size or extraction time) with confidence.
Think of dosing as setting the canvas for your espresso shot. If you start with the wrong size canvas, no amount of tamping, distribution, or brewing magic will make the picture come out right.
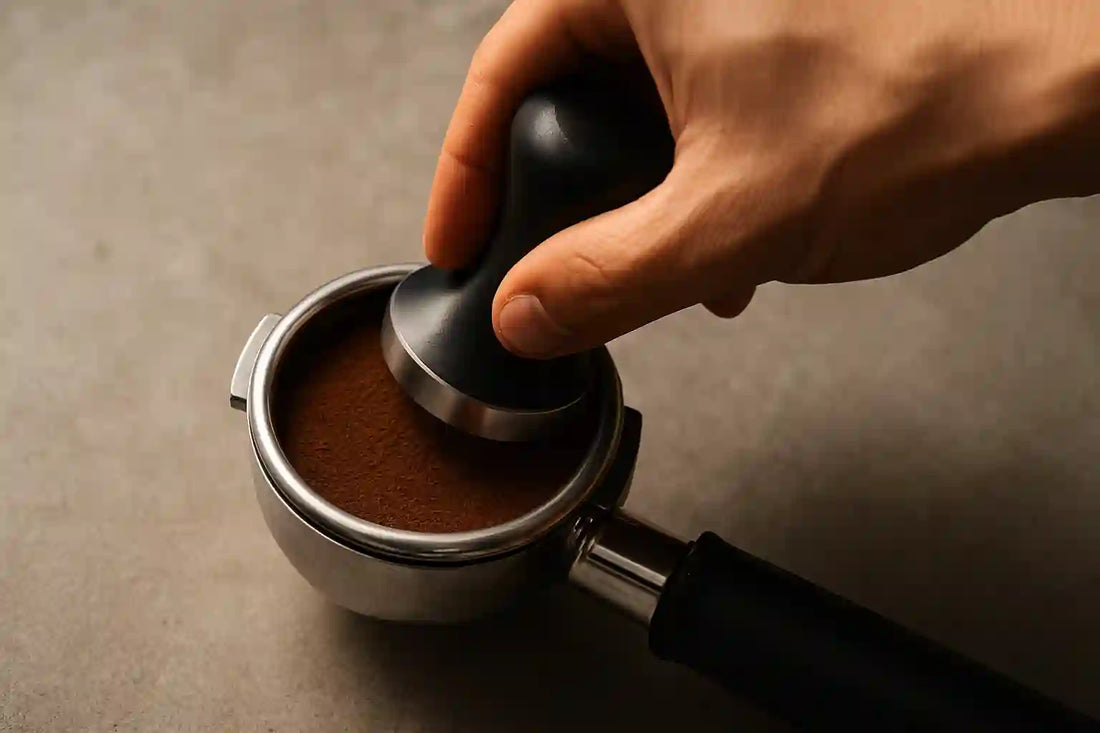
Step-by-Step: How to Tamp Like a Pro
If dosing is about how much coffee goes in the basket, tamping is about how evenly and firmly you lock it into place. This is the part most people overcomplicate, but once you get the rhythm, it’s second nature.

Let’s walk through it step by step:
1. Hold the Tamper Level (No Guessing)
Think of your tamper like a spirit level. If you press at even the slightest angle, water under 9 bars of pressure will find the weak spot and dig a hole straight through, what we call channeling.
So before you press down, take half a second to make sure the base of your tamper sits flat and flush with the rim of the portafilter basket.
2. The “Handshake Grip”
Instead of awkwardly pressing down with your fingers or wrist, hold the tamper like you’re shaking someone’s hand. Straight wrist, elbow at 90 degrees, shoulder above the basket.
This way, the pressure comes from your body weight, not just your wrist, and you’ll tamp evenly without straining yourself.
3. Pressure: Consistency Over Brute Force
You’ve probably heard the number “30 pounds of pressure.” Honestly? That’s more of a guideline than gospel. The key is consistency.
Whether you tamp at 20lbs, 30lbs, or 40lbs, the important thing is to repeat the same force every time. Think muscle memory, not maximum strength.
Here’s a trick: tamp firmly once, stop, and don’t double-tamp. Re-tamping after the first press just disturbs the bed you worked so hard to level.
4. The Polishing Spin (Optional but Fun)
Some baristas like to give the tamper a tiny twist at the end—a little polishing spin that smooths out micro-grains on top.
Is it necessary? Not really. Does it look pro and make you feel like a ritual master? Absolutely. If it makes you smile, do it.
👉 By now, you’ve got a flat, even, compacted puck that can handle high-pressure water without giving way. Combined with a precise dose and proper distribution, this step turns your espresso from “meh” to “wow.”
Tamping Pressure: Does It Really Matter?
Here’s the part that usually stirs up debate in every barista forum and Reddit thread: how hard should you tamp?
If you’ve hung around coffee circles long enough, you’ll hear numbers like 30 pounds of pressure thrown around as if it’s some sacred law of espresso.
But here’s the truth backed by both research and the collective wisdom of seasoned baristas, pressure doesn’t matter nearly as much as you think.
Studies and countless side-by-side tests show that whether you tamp with 5 pounds or 40 pounds of force, the actual extraction yield barely changes… as long as the tamp is level. That last part is the real game-changer.
If your tamp is crooked, water will rush to the lower side and cause channeling no matter how much muscle you put into it.
And if you peek into Reddit discussions, you’ll notice a common refrain: “Consistency matters more than force.” They’re right. Your goal isn’t to hit a magic number on some invisible scale, it’s to tamp the same way every single time.

So what’s the takeaway? Find a pressure that feels natural and repeatable for you, whether it’s a gentle firm push or something with a bit more strength and make it your signature move.
Your espresso will thank you for it, and so will your wrists.
Tools That Help: Distribution & Tamping Aids
Let’s be honest: even the steadiest hands can slip, and not everyone wants to train like a barista-athlete just to get a level tamp every morning. That’s where tools come in to save your sanity (and your shots).
Distribution Tools (a.k.a. WDT, Levelers, or Puck Rakes):
These little gadgets stir or rake your grounds before tamping. The goal? Break up clumps, spread coffee evenly, and give water zero excuses to go rogue. Think of it as fluffing the pillow before laying down.
Palm/Twist Levelers:
Instead of pressing down, these tools sit on your portafilter and spin to flatten the surface. You still tamp afterward, but now you’re tamping onto a perfectly even bed. Less guesswork, more repeatability.
Calibrated Tampers:
If you’re someone who needs numbers, these tampers click or stop at a preset pressure (often ~30 lbs). It’s like training wheels—great for building muscle memory, but most pros eventually wean off them.
Automatic Tamping Stations (hello, Puqpress):
The fancy café solution. Push a button, get a perfectly leveled, consistent tamp every time. Zero wrist strain. Overkill for home? Maybe. Game-changer for a high-volume café? Absolutely.
Bottom line: tools don’t replace skill, but they take out some of the human error. If you’re chasing consistency or just want to cut down on those “channeling roulette” mornings, they’re worth considering.
Common Tamping Mistakes to Avoid
Even if you’ve got a shiny tamper and the right technique, a few little slip-ups can undo it all.

Here’s what to watch out for:
The Tilted Tamp
Pressing at an angle is the fastest way to invite channeling. Water loves shortcuts, and a slanted puck is basically an open highway.
Over-Crushing the Coffee
People hear “30 lbs of pressure” and suddenly turn into bodybuilders. Truth is, pressing harder doesn’t mean better extraction—just sore wrists and dented coffee beds.
The Double Tamp (a.k.a. Tamp, Adjust, Tamp Again)
Resist the urge. Once is enough. Tamping twice just messes with the density of the puck and leads to uneven flow.
Messy Edges
Grounds stuck on the rim of the portafilter? Knock them off. If the basket edge isn’t clean, the water finds gaps and gushes right through.
Inconsistent Routine
Some days you tamp like a feather, other days like Thor’s hammer. Espresso hates mood swings. Pick a comfortable pressure and repeat it every time.
The goal isn’t perfection, it’s consistency. Avoid these pitfalls, and you’ll be ahead of 90% of home baristas out there.
Advanced Tips: Going Beyond the Basics
Once you’ve nailed the fundamentals, there’s room to level up your tamping game. Think of these as bonus moves, small tweaks that can make a big difference:
WDT + Tamp Combo
Use a Weiss Distribution Tool (WDT) to break up clumps before tamping. It evens out the coffee bed so your tamp actually has something uniform to press into.
Pre-Tamp Shake or Tap
A gentle shake or light tap of the portafilter before tamping helps settle grounds evenly, reducing the risk of air pockets. (Careful though, too aggressive and you’ll get uneven density).
The Polishing Spin
That little twist at the end of your tamp? It doesn’t really affect extraction, but it gives the surface a smooth, pro-barista finish. Aesthetic points unlocked.
Leverage Tools for Consistency
Calibrated tampers, palm tampers, or even puck-leveling tools can remove the guesswork. Helpful if you’re pulling multiple shots back-to-back.
Mind the Micro-Details
Keep an eye on humidity, roast level, and grind size. Darker roasts compact differently than light ones, sometimes needing gentler tamping.
At this point, you’re not just tamping, you’re sculpting the perfect launchpad for espresso extraction.
Conclusion: The Zen of Tamping
At the end of the day, tamping isn’t about brute force or flashy spins. It’s about respecting the coffee bed you’ve just crafted.
Distribution lays the foundation, tamping seals the deal, and consistency ties it all together. Whether you’re pressing with 10 lbs or 30 lbs of force, the magic happens when your puck is even, level, and repeatable.
Think of tamping as the quiet ritual before the espresso symphony begins. Done right, you’ll taste it in every balanced sip. Done wrong? Well, let’s just say you’ll know when your shot sprays like a garden hose.
So, relax the shoulders, breathe, tamp steady. Your coffee deserves it.
FAQs: Barista Myths & Quick Fixes
Q1: Do I need exactly 30 lbs of pressure to tamp?
Nope. That “30 lbs” thing is more guideline than law. What really matters is that your tamp is level and consistent. If you’re comfortable tamping lighter or heavier but can repeat it every time, you’re good.
Q2: Should I tap the portafilter after tamping?
Not recommended. Knocking the side can crack the puck and cause channeling. If you need to clean stray grounds, use a brush or wipe the rim.
Q3: Does the polishing spin actually help?
Functionally? Not much. It’s mostly a cosmetic flourish. But hey, if it makes you feel like James Bond pulling a ristretto, why not?
Q4: Why does my espresso still channel even if I tamp well?
Channeling is usually about distribution, not tamping. Fix the grind size, dose, or distribution before blaming your tamp.
Q5: Do fancy tampers make better coffee?
They make more consistent coffee. A calibrated or palm tamper won’t magically improve flavor, but they’ll reduce human error—handy if multiple people are pulling shots.
Q6: Can I tamp too hard?
Yes, but not in the way you think. Overly hard tamping won’t over-extract by itself. The real risk is straining your wrist and compacting unevenly. Remember: consistency > strength.


