How to Properly Bloom your Pour Over Coffee: The Most Definitive Guide
Share
Most people who brew pour over coffee at home focus on gear, beans, and ratios , but there’s one step that quietly holds the key to unlocking a cup’s full potential: the bloom.
If you’ve ever poured hot water onto fresh grounds and seen them rise, fizz, or bubble, you’ve witnessed the “bloom” in action. It lasts barely 30 seconds, yet this phase can dramatically change the taste, clarity, and balance of your coffee.
When I first started brewing pour overs, I’ll admit I didn’t think blooming mattered. It felt like a fancy extra step, the kind of thing baristas do in cafés, but not something home brewers needed to worry about.
That changed the day I did a side-by-side test: one cup with a proper bloom, one without. The difference was obvious. One was vibrant and sweet. The other? Flat, slightly bitter, and hollow.
This guide is for anyone who’s ever asked:
- “What does blooming even do?”
- “Why does my pour over taste inconsistent?”
-
“Is this just another coffee myth?”
I’ll walk you through exactly what blooming is, why it matters, and how to do it step-by-step like the pros do. We’ll explore the science behind it, the gear that helps, common mistakes to avoid, and even how to troubleshoot your brews if they’re not blooming properly.
By the end of this guide, you won’t just know how to bloom your coffee, you’ll understand why it’s a game-changer for flavor.
Let’s dive in. Your best cup yet might just be one bloom away.
What Is Blooming in Pour Over Coffee?
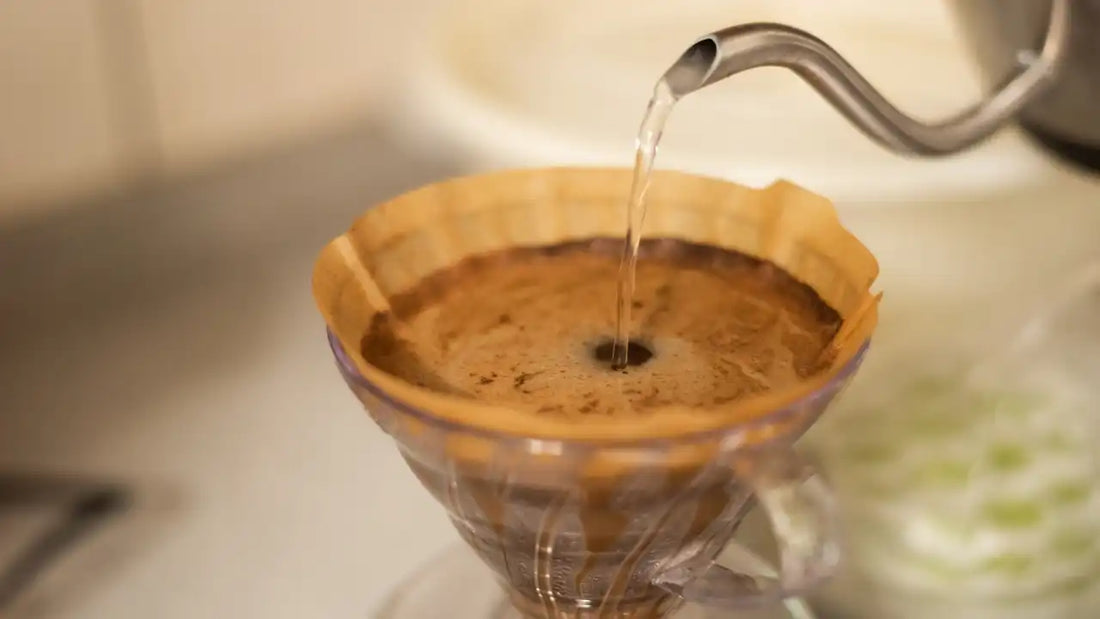
Imagine this: you take freshly ground coffee, pour hot water over it, and it suddenly swells up, bubbles, and releases a wave of aroma. That’s not just theatrics, that’s the bloom.
In simple terms, blooming is the initial wetting of the coffee grounds, usually the first 30 to 45 seconds of your pour over brew.
It’s the moment when trapped gases, mainly carbon dioxide (CO₂), escape from the coffee bed.
Why does this matter?
Freshly roasted coffee still contains CO₂ from the roasting process. If you skip the bloom, that gas fights with the water during brewing, making it harder for water to extract the coffee’s flavors evenly.
Think of it like trying to water a sponge that’s full of air, the water just rolls off, failing to soak in properly.
What you see isn’t just pretty, it’s science.
- Those bubbles? That’s CO₂ escaping.
- The rising and puffing up? That’s the coffee bed degassing and preparing to absorb water evenly.
- The aroma? That’s the beginning of volatile oils being released, your first hit of the flavor journey ahead.
So, blooming is like…
- Stretching before a run: It prepares the grounds for consistent extraction.
- Letting a cake rest before slicing: It improves structure and end result.
-
The opening act before a concert: Often overlooked, but it sets the tone for everything that follows.
It’s a small window of time, but it’s where flavor clarity is born. Skip it, and you risk under-extraction, sourness, or a flat cup, no matter how good your beans or gear are.
The Science Behind Coffee Bloom
Ever poured hot water over your freshly ground coffee and noticed it puff up, rise, and bubble like it’s alive?
That magical reaction is called the coffee bloom, and it’s not just for show, it’s chemistry doing its delicious thing.
Degassing 101: CO₂ Wants Out
Freshly roasted coffee holds on to a lot of carbon dioxide (CO₂), a byproduct of roasting that stays trapped inside the bean.
Right after roasting, this CO₂ starts escaping naturally over time, a process called degassing.
But here’s the catch:
If you brew coffee too soon after roasting without allowing this gas to escape, or skip blooming altogether, the CO₂ will rush out during brewing, pushing water away from the grounds and leading to a weak, uneven extraction.
Why Too Much CO₂ Hurts Extraction
Imagine trying to soak a sponge that’s filled with air. Water can’t penetrate properly.
That’s what happens when CO₂ gets in the way, your water doesn’t extract those flavorful oils, acids, and sugars evenly. You’re left with coffee that tastes flat, sour, or hollow.
Blooming fixes that.
Blooming = Better Water Absorption
When you add just a bit of hot water during the bloom phase (usually 30–45 seconds), you’re basically burping the coffee.
CO₂ escapes, making space for full water absorption in the next pour. This small step unlocks better flavor, aroma, and clarity in your cup.
Flavor, Aroma & Body
A good bloom = a good brew.
- Clarity improves because extraction is more uniform.
- Aromas become more pronounced because you’re not masking them with trapped gas.
-
Body feels more balanced because you’re not under-extracting any parts of the grind bed.
Light vs. Dark Roasts: Do They Bloom Differently?
Yes.
- Light roasts tend to hold more CO₂ for longer. They bloom more dramatically, sometimes rising like a muffin top.
-
Dark roasts degas faster post-roast, so their bloom is often gentler, but still important.
So whether you’re brewing a floral Ethiopian or a deep, chocolaty dark roast, a proper bloom is your ticket to a balanced cup.
Why Blooming Matters (Especially for Indian Home Brewers)
You might be thinking, “Okay, blooming sounds cool… but does it really make a difference in my cup at home?”
The answer is, absolutely, yes.
Especially if you’re brewing in India.
Here’s why blooming isn’t just a fancy ritual but a practical must for Indian home brewers:
1. Most Indian cities have hard water
Hard water slows down extraction and can mute coffee flavors.
Blooming gives your coffee a head start, helping it release trapped gases so your water can get straight to extracting what matters, sweetness, acidity, complexity.
Tip: If you live in Delhi, Mumbai, or Bengaluru, your water’s probably on the harder side. Try using filtered or RO water for better results.
2. We live in a hot and humid climate
Coffee beans (especially ground coffee) degas faster in warm, humid air.
But here’s the twist, some CO₂ still gets trapped, especially in freshly roasted beans.
So even if your beans are 10–15 days post roast, they’ll still bloom.
Skipping it can lead to:
- Sour, tangy notes (under-extraction)
-
Uneven flavor (one part bitter, one part flat)
At BrewClan, we roast in small batches and ship super fresh, meaning our coffee still holds a lot of CO₂, which makes blooming even more essential. Check out our collection.
3. Most Indian home brewers use entry-level gear
Let’s face it, not everyone has a Hario V60 or a Fellow Stagg EKG kettle at home. And that’s okay.
But when your grinder isn’t perfect or your pour control isn’t precise, blooming becomes your secret weapon to balance things out.
Even with a basic drip filter, blooming can help reduce channeling (water rushing through one spot) and give you a more even cup.
4. It brings out origin-specific flavors better
Indian specialty coffee, like the ones from Baarbara, Kelagur, or Thogarihunkal estates, have subtle notes: cocoa, stone fruit, caramel, citrus. These flavors need a calm, even extraction.
Skipping blooming is like fast-forwarding through the movie’s best scenes.
Bottom Line:
If you’re brewing fresh, whole bean coffee at home in India, always bloom.
It’s free, takes 30 seconds, and makes a world of difference.
Step-by-Step: How to Bloom Pour-Over Coffee Like a Pro
Ready to level up your pour-over game?
Here’s how you can bloom your coffee like the pros, even if you’re just getting started.
a. Prepping Your Gear
First things first, great coffee starts with the right setup. Here’s what you’ll need:
-
Filter – usually paper, suited to your dripper
-
Dripper – V60, Origami, Chemex, or whatever you love
-
Gooseneck kettle – for controlled, gentle pouring
-
Coffee scale + timer – precision matters
-
Fresh, medium-fine ground coffee – ideally roasted within 2–3 weeks
-
Filtered water – clean water = clean cup
💡 Don’t skip this:
Always pre-wet your paper filter with hot water.
This removes any papery taste and also warms up your dripper and carafe. Discard the rinse water before you brew.
b. The Actual Blooming Process
Now the fun begins.
- Measure your coffee – Let’s say you’re using 15g of ground coffee.
-
Start your timer and pour water – Use water at about 90–96°C (just off boil). Slowly pour about 2x the weight of coffee, so 30g of water for 15g coffee.
-
Pour gently in a spiral or center-to-out motion to ensure all the grounds get wet.
-
You’ll see the coffee rise and bubble, that’s the CO₂ escaping.
-
Wait 30 to 45 seconds. Let the coffee de-gas and settle. This is your bloom phase.
c. Continue Brewing
Once blooming is done, begin your main pour.
-
Pour slowly in stages or in a continuous stream (your call).
-
Total brew time should be around 2:30 to 3:30 minutes depending on your method.
-
Use a 15:1 to 16:1 water-to-coffee ratio for a balanced cup (i.e., 225–240g water for 15g coffee).
The result? A clean, vibrant, and full-bodied cup that reflects the true character of your beans.
What Is the Ideal Bloom Ratio for Pour-Over?
If you’ve ever wondered, “How much water should I pour during the bloom?”, you’re not alone. And yes, it really matters.
The Sweet Spot: 2:1 Ratio
The gold standard bloom ratio is:
2x the weight of your coffee in water.
So if you’re using:
- 15g of coffee → 30g of water
-
20g of coffee → 40g of water
This amount is just enough to saturate all the grounds evenly and kickstart degassing, without overwhelming them.
Why You Shouldn’t Overdo It
Too much water during the bloom?
Here’s what can go wrong:
- Grounds may float or clump together unevenly
- You risk channeling during the main pour (uneven extraction)
- Your coffee might taste flat or muted, losing its depth
A light, even bloom is what allows your brew to shine with balance and clarity.
Brewing Ratio Reference
After blooming, your total brewing ratio (coffee to water) should typically fall in the range of:
- 1:15 – richer, fuller-bodied cups
- 1:16 to 1:17 – balanced, well-rounded flavor
- 1:18 – lighter, more tea-like expression
Signs of a Good (or Bad) Bloom
Ever poured water and thought, “Is this blooming right?”
The bloom tells you more than you think, if you know what to look for.
A Good Bloom Looks Like This:
- Bubbly and lively: You’ll see CO₂ bubbles rising quickly to the surface
- Even expansion: The coffee bed swells slightly and stays level, no “valleys” or dry patches
- Sweet, fragrant aroma: Like warm toast, caramel, or fresh bread, a good sign of fresh, well-roasted beans
- Lasts about 30–45 seconds: Enough time for degassing and saturation
This means your coffee is fresh, your grind is even, and your pour was spot on. Good job, barista!
A Bad Bloom? Here’s What to Watch Out For:
|
Sometimes even great beans bloom poorly if stored wrong.
Freshness, grind, pour, they all play a role here.
Troubleshooting: Why Isn’t Your Pour-Over Blooming?
You did everything “right”… but your coffee just sits there. No puffing, no bubbling, no drama.
So where’s the bloom?
Let’s figure it out, here’s what might be going wrong:
1. Stale or Old Coffee Beans
If your beans were roasted weeks (or months) ago and stored in a not-so-air-tight jar, chances are the CO₂ has already escaped.
No gas = no bloom.
Always check the roast date, aim to brew within 2–30 days post-roast for the best bloom.
2. Grind Size Too Coarse
Big chunky grounds = less surface area = poor gas release.
For pour-over, you want a medium-fine grind, something like table salt.
Dial it in with your grinder and watch the bloom perk up instantly.
3. Water Temperature Is Too Low
CO₂ escapes faster with hotter water.
If your water’s below 90°C (194°F), you’re missing the degassing sweet spot.
Aim for 92–96°C (197–205°F), not boiling, but close.
4. Too Little Water During Bloom
Blooming with only a splash? That’s not going to cut it.
You need about 2x the weight of your coffee in water,
for 15g coffee, bloom with ~30g water.
This ensures all grounds are saturated and gas is forced out.
5. Over-Roasted Beans (AKA Too Dark)
Dark roasts naturally lose more CO₂ during roasting, especially if they’re past second crack.
They can still taste great, but may bloom less intensely.
No need to worry unless your brew also tastes flat or bitter.
Bonus Fix:
Try pre-infusing slightly longer, up to 45 sec, if your beans are borderline fresh.
Sometimes just giving it time helps coax out the bloom.
How to Improve Your Pour-Over Coffee (Starting with Bloom)
If you’ve ever sipped a pour-over that tasted flat or muddy, or just kinda meh, chances are something went wrong in the early stages… especially the bloom.
Here’s how to level up your brew game, starting right at the bloom:
1. Use Freshly Roasted Beans (Within 2–3 Weeks)
Coffee is a living, breathing product, literally.
Right after roasting, beans release CO₂ for weeks.
For the best bloom and flavor, brew between Day 3 and Day 21 post-roast.
Pro tip: Buy from roasters who mention the roast date (like us!).
2. Use a Burr Grinder for Evenness
Blade grinders? Random, uneven particles.
Burr grinders? Consistent grind = consistent extraction = smooth, balanced coffee.
Use a medium-fine setting for pour-over, and adjust based on how your brew flows.
3. Master the Spiral Pour (Gooseneck Kettle FTW)
A gooseneck kettle gives you precision control.
Practice slow, circular pours, from center out, then back in, during the bloom and beyond.
Even saturation = even extraction = better clarity and balance.
During the bloom, aim to finish your initial pour in 5–10 seconds max.
4. Use a Scale and Timer, No Guesswork
It’s 2025. Stop eyeballing your coffee and water.
A digital scale helps you nail the bloom ratio (2:1 water:coffee), and a timer keeps your flow consistent.
15g coffee → 30g water → 30–45 sec bloom → continue pour.
It’s that simple, and that game-changing.
5. Store Your Beans Like They’re Gold
Light, air, and moisture = enemies of freshness.
Use resealable, opaque bags with one-way valves (like ours!) that let CO₂ escape but keep oxygen out.
Keep them in a cool, dark place, not the fridge.
These tiny upgrades can completely change your cup, and it all starts with the bloom.
Common Mistakes to Avoid When Blooming Your Coffee
Even seasoned brewers slip up sometimes. But if you’re serious about getting the most out of your pour-over, watch out for these common (and totally fixable) mistakes:
1. Skipping the Bloom Entirely
Think of blooming like stretching before a run.
If you skip it, your coffee grounds won’t “wake up,” and your brew will taste dull, sour, or both.
No matter how good your beans are, don’t skip this step.
2. Rushing the Bloom Phase
Pour, wait. Simple, but easy to mess up.
Cutting bloom time short (less than 30 seconds) means CO₂ doesn’t fully escape.
That trapped gas creates uneven extraction, leading to harsh or muted flavors.
Patience = sweetness, clarity, and balance.
3. Not Using a Timer or Scale
This isn’t guesswork.
Brewing great coffee is science and art, and both need data.
Use a scale to hit your bloom ratio (2:1 water to coffee by weight),
and a timer to bloom for 30–45 seconds.
Trust us, it’s the difference between “just okay” and “holy wow.”
4. Pouring Too Fast or Unevenly
A sloppy pour during bloom means dry patches, uneven saturation, and channeling.
Translation: some grounds do all the work, others sit there sulking.
Use a gooseneck kettle to gently pour in spirals, or a center-out motion. Cover all grounds evenly, no flooding!
5. Using Pre-Ground Supermarket Coffee
You could do everything else right,
but if your coffee is pre-ground and stale? Game over.
CO₂ is long gone.
Flavors are flat.
And your bloom? Barely a fizz.
Always grind fresh. Always choose high-quality, recently roasted beans.
Avoid these mistakes and you’ll be brewing like a pro, no barista badge needed.
In Short: Don’t Skip the Bloom, Don’t Rush It
Blooming may seem like a tiny step, but it makes a huge difference in how your coffee tastes.
Use fresh beans, pour mindfully, and time it right, avoid the common slip-ups, and your pour-over will go from average to exceptional.
FAQs About Coffee Bloom & Pour-Over Brewing
Q1. How do I improve my pour-over coffee?
Start with freshly roasted beans, use a burr grinder, and always bloom your coffee. Use a scale and timer for accuracy, and pour slowly with a gooseneck kettle for control.
Q2. What is the ideal bloom ratio for pour-over coffee?
Use 2:1 water to coffee by weight for blooming. That means if you’re using 15g of coffee, pour 30g of water during the bloom phase.
Q3. Why doesn’t my pour-over coffee bloom?
Most likely, your coffee is stale. Other common causes: grind too coarse, water too cold, or not enough water used in the bloom phase.
Q4. Can you skip blooming coffee?
Technically yes, but you’ll miss out on flavor, aroma, and clarity. Blooming allows trapped CO₂ to escape, letting water extract the good stuff from the grounds evenly.
Q5. Does bloom affect caffeine content?
Not directly. Blooming mainly impacts flavor clarity and extraction efficiency, but it doesn’t significantly alter the caffeine level in your cup.
Q6. What if I use pre-ground coffee?
Pre-ground coffee may still bloom a little, but you’ll get less CO₂ release and muted flavors. Fresh grinding always wins.
Q7. How long should I let coffee bloom?
30 to 45 seconds is ideal. This gives enough time for CO₂ to escape without stalling your brew.
Q8. Does the roast level affect bloom?
Yes! Light roasts typically bloom more due to higher CO₂ content, while dark roasts degas faster and show a gentler bloom.
Q9. Is blooming important in other brew methods too?
Absolutely. Blooming helps in French press, AeroPress, and even cold brew (to a lesser extent). Anytime you’re working with fresh beans, give them a chance to bloom!
Q10. Can I bloom with cold water for iced coffee?
Nope. Blooming requires hot water (~90–96°C) to release CO₂ effectively. For iced pour-overs, do a hot bloom first, then switch to your cold pour.


